8 WebGL basics
We have studied the basics of computer graphics in details and have learned at a high level what WebGL, the implementation of the graphics pipeline we are going to use, is. It's now time to learn how to use WebGL to write computer graphics applications.
Before proceeding further, we recommend the reader read and follow the instruction in Appendix A in order to run the sample code in this chapter.
8.1 Program 1: Your first WebGL program
This program is available in the chapter-08/program-01 directory of the accompanying code repository. If you run it, the following is the screen that you would see.
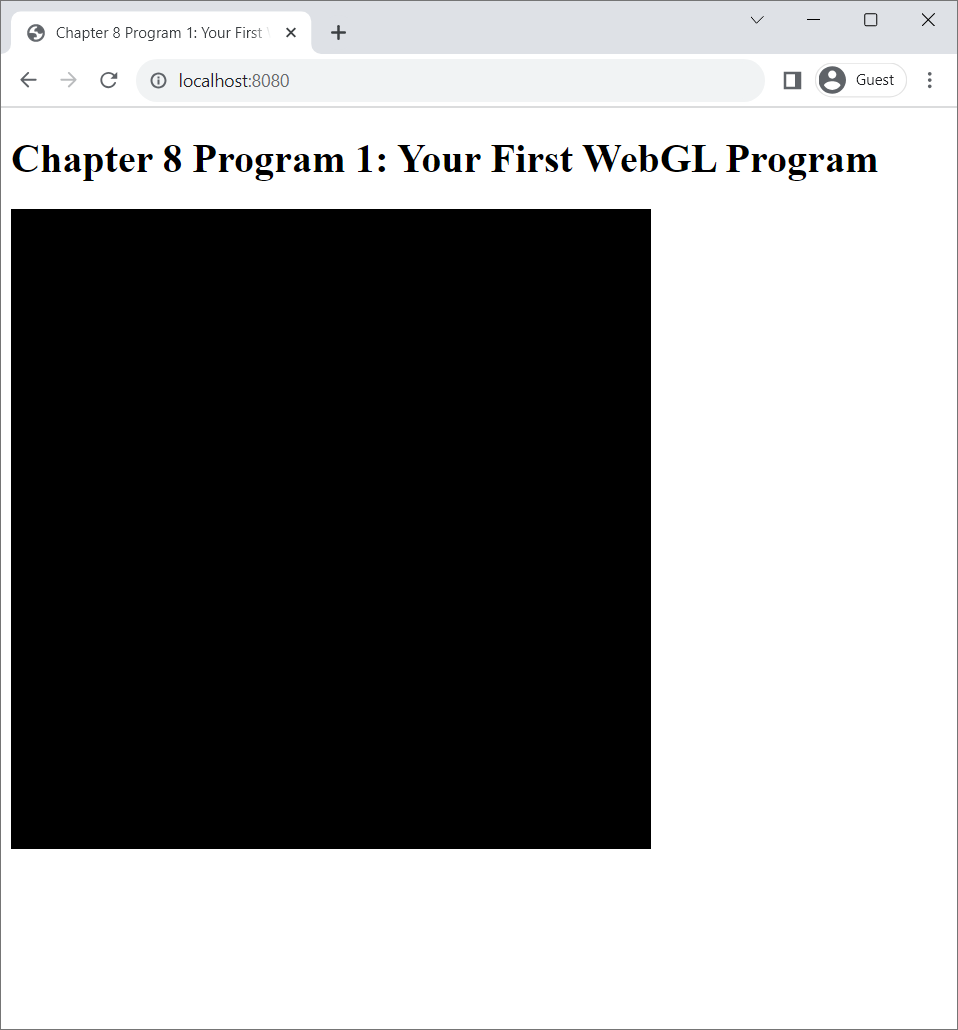
As you can see, the program does not do much. It just displays a black square. However, this square is a very important part of every WebGL program.
We have learned in the last chapter that the output of a rendering algorithm is an image, which must be shown to the user somehow. For our rendering algorithm, WebGL, its outputs are typically displayed on a canvas HTML element. As a result, the first step in creating a WebGL application is to create a canvas that will act as the "screen" to project 3D scenes. We can see how this is done in the index.html file of Program 1.
<canvas
  id="webglCanvas"
  style="border: none; background-color: black;"
  width="512"
  height="512">
</canvas>index.html file of Program 1.Here, we use a canvas tag to specify a canvas element. In the tag, we can specify the canvas' ID, CSS style, width (in pixels), and height (also in pixels). It is very important to specify the ID because we will use it to refer to the canvas in the Javascript code, which is shown below.
const $ = require('jquery');
let canvas = $("#webglCanvas");
let gl = canvas[0].getContext("webgl2");
if (!gl) {
    alert("Cannot get WebGL 2.0 context!");
}index.js file of Program 1.To make manipulation of HTML elements easier and more concise, we make use of the jQuery library, which we import into the customary $ symbol. We immediately use it to retrieve all HTML element with ID "webglCanvas" in Line 2 of Lising 8.2. (Note that we must add # in front of the ID like in "#webglCanvas" in order to tell jQuery to look for elements with IDs equal to what come after the # mark.) What is stored in the canvas variable is a jQuery object that contains all HTML elements that have the specified ID. These can be accessed by indexing the jQuery object. So, the one canvas element in index.html can be retrieved as canvas[0] as in Line 3. Because it is a canvas element, it is an instance of the HTMLCanvasElement class.
In order to use WebGL, we need an object called the WebGL context, which gives access to functions and constants that make up the WebGL API. In Javascript, it is an instance of the WebGL2RenderingContext class, and it can be obtained by calling the getContext method on an instance of the HTMLCanvasElement class, which we have just retrieved using jQuery. Because we want to use a WebGL 2 context, we must give the string "webgl2" as the argument of the method like in Line 3 of Lising 8.2.
If your web browser supports WebGL 2.01, the getContext method should return a WebGL context. Otherwise, it would return null. In Line 4 to 6 of Lising 8.2, we check whether return value is null or not. If it is, we show an alert message. As a result, Program 1 runs successfully if you do not see any alert windows after loading the web page.
To recap, our first program does the bare minimum of what can be called a program that uses WebGL 2.0: creating a canvas element and retrieving a WebGL context from it.
8.2 Program 2: Getting info about WebGL context
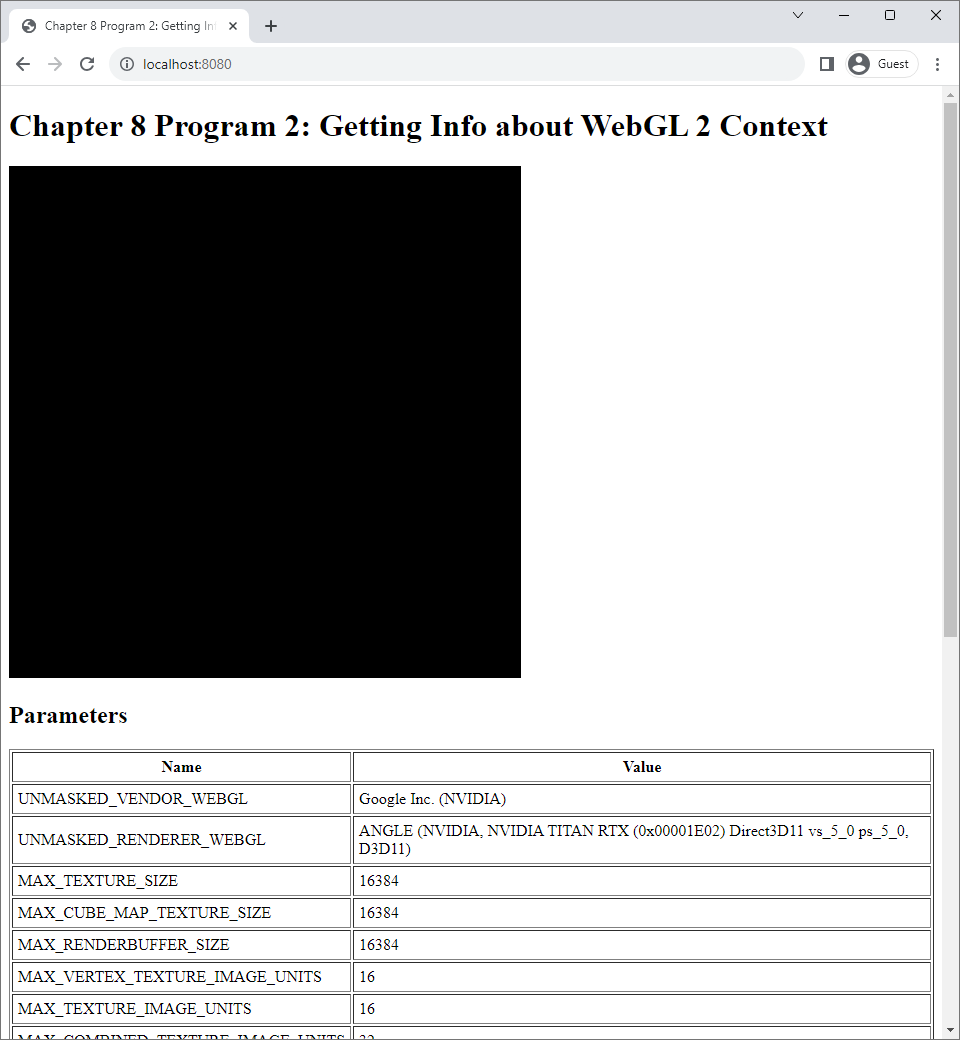
In the second program, we become more familiar with the WebGL context. The program's source code is available in the chapter-08/program-02 directory. The screenshots of the program is given below.
 |
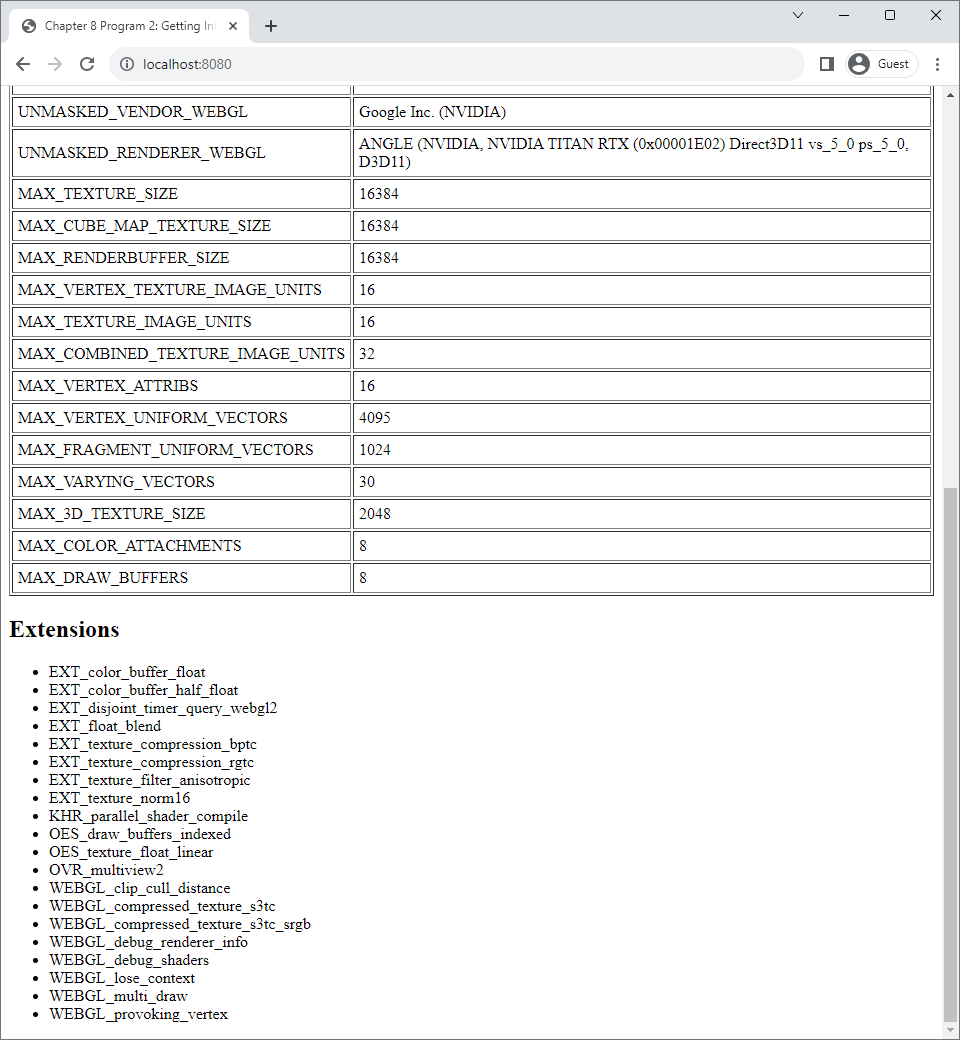 |
As we can see from the screenshots, the web page has a canvas element like that of Program 1, but Program 2's web page now has two more sections—"Parameters" and "Extensions"—that show information about the WebGL context.
8.2.1 WebGL context's fields and methods
Before discussing what the program does, let us talk about the WebGL context. First of all, it is a Javascript object, which means that it contains fields and methods. A large number of WebGL context's fields are numerical constants, and all of them are listed in this web page. These constants are of type GLenum, which is simply a shorthand for unsigned long. The name GLenum signifies that the values are part of a fixed set of defined constants, like in enumerate types of many other programming languages. We mainly use GLenum values as arguments to WebGL context's methods. For example, if we want WebGL to perform the depth test (Section 7.5.2), we would issue the following statement.
gl.enable(gl.DEPTH_TEST);Here, the variable gl is suppoosed to hold a WebGL context, which we can obtain using the process in Program 1. enable is a method that is used to turn on WebGL features. The feature we turn on with the above statement is the depth test, and we indicate this with the GLenum value stored in the gl.DEPTH_TEST field.
Methods of a WebGL context correspond to functions defined in the WebGL 2.0 API specification. Documentation of the actual methods can be found in the documentation page for the WebGL2RenderingContext class, where all methods are listed in this table along with information about which methods are available in which major browsers.
One good thing to know is that these methods often come from C functions in the OpenGL API, and these functions names always begin with "gl". For example, the enable method above corresponds to the glEnable function in standard OpenGL. Hence, a quick way to find documentation for a WebGL context's method is to take the method name, capitalize the first letter, add gl in front of the name, and search for the resulting name with a search engine or ask an LLM about it.
8.2.2 WebGL parameters
A WebGL context maintains a collections of values called parameters, each of which indicates a particular setting of the WebGL implementation. These include, among other things, (1) whether a certain functionality such as the depth test is enabled or not, (2) the width in pixels of line primitives, and (3) the maximum number of attributes a vertex can have. These values can be accessed by calling WebGL context's getParameter method, passing a GLenum value that indicates the parameter we want to fetch. For examples, the following code snippet retrieves the three parameters we just discussed.
gl.getParameter(gl.DEPTH_TEST);
gl.getParameter(gl.LINE_WIDTH);
gl.getParameter(gl.MAX_VERTEX_ATTRIBS);
The return values of the getParameter method have different types that depend on the method's input. While gl.getParameter(gl.DEPTH_TEST) would return a boolean indicating whether the depth test is enabled or not, gl.getParameter(gl.LINE_WIDTH) would return a floating point value, and gl.getParameter(gl.MAX_VERTEX_ATTRIBS) would return an integer.
One thing that Program 2 does is using getParameter to retrieve a number of parameters and display the values nicely in a table. A lot of these parameters have names that being with MAX, and they indicate the limits of various settings of the particular WebGL implementation in the browser you use.
8.2.3 WebGL extensions
Some browsers implement functionalities that are not included in the standard WebGL 2.0 specification. Related functionalities are grouped together in bundles called extensions, and all extensions that are recognized by Khronos are listed in this web page. Extensions are referred to by names such as WEBGL_debug_renderer_info, WEBGL_multi_draw, OES_texture_float_linear, and so on.
The functionalities of an extension are not enabled by default. To use an extension, one must explicitly request it by calling the getExtension method of a WebGL context, giving the method the extension's name. For example, Program 2 uses the WEBGL_debug_renderer_info, and it retrieves the extension with the following statement:
let debugInfo = gl.getExtension('WEBGL_debug_renderer_info');The getExtension method would return an object that would give us access to the extension's specific constants and functions. In particular, we use the extension above to retrieve the GLenum values called UNMASKED_VENDOR_WEBGL and UNMASKED_RENDERER_WEBGL, which can be used as arguments to WebGL context's getParameter method in order to retrieve information about the WebGL implementation's vector and renderer. According to Figure 8.2, which contains the result of running Program 2 on the author's computer, we learn that the vendor was Google Inc., and the renderer was called "ANGLE."
8.2.4 How Program 2 works
Let's look at Program 2's code to see how it functions. The index.html file is pretty much the same as the same file of Program 1, except that it has two div elements that are going to host the parameter table and the list of supported extensions.
  <h2>Parameters</h2>

  <div id="paramsTable"></div>

  <h2>Extensions</h2>

<div id="extensionList"></div>index.html file of Program 2.The index.js file is much longer than that of Program 1. We obtain the WebGL context the same way we did in Program 1. This time, the if statment that checks whether the WebGL is present now has an else clause where we extract information about the WebGL context. The else clause has two sections. The first section fills the "Parameters" section in the web page, and the second fills the "Extensions" section.
8.2.4.1 Retrieving WebGL Parameters
The first statement in the first section of the else clause is:
let debugInfo = gl.getExtension('WEBGL_debug_renderer_info');Here, we retrieve the object that represents the WEBGL_debug_renderer_info extension, and we do so because we want to read the parameters that are identified by the UNMASKED_VENDOR_WEBGL and UNMASKED_RENDERER_WEBGL constants. The next stament defines a list of names of WebGL properties that we want to retrieve.
let paramNames = [
  "UNMASKED_VENDOR_WEBGL",
  "UNMASKED_RENDERER_WEBGL",
  "MAX_TEXTURE_SIZE",
    :
    :
    :
];
Because what are stored in the gl and the debugInfo variables are Javascript objects, we can retrieve their fields by indexing them with the string that represents the name of the field. For example, we can retrieve the MAX_TEXTURE_SIZE field of the gl variable with
gl["MAX_TEXTURE_SIZE"]in addition to doing so with gl.MAX_TEXTURE_SIZE. Retrieving a field in this way allows us to programmatically retrieve multiple fieds without writing a separate line of code for different fields. We take advantange of this capability in the next line of code, where we turn the list of field names to a list of HTML table rows, each containing a parameter name and its value.
let tableRows = paramNames.map(paramName => {
let paramID = gl[paramName] || debugInfo[paramName];
let value = gl.getParameter(paramID);
return "" + paramName + " " + String(value) + " We see that, for each parameter name in the paramNames list, we first retrieve its GLenum value by looking up the field with the corresponding name in either the gl or the debugInfo variables. The || operator in the 2nd line allows us to try to retrieve the GLenum value from the gl variable first. If this fails, we will get the undefined value, and the program would then attempt to retrieve the value from the debugInfo variable instead. Note that we need to do this because the GLenum values associated with UNMASKED_VENDOR_WEBGL and UNMASKED_RENDERER_WEBGL are not available in the standard WebGL context, and they are only available in in the WEBGL_debug_renderer_info extension. Once we have retrieved the GLEnum value, we can pass the value to the getParameter method of the WebGL context to obtain the WebGL parameter.
The next two statements in this Section simply create an HTML table out of the table rows computed by the previous statement and then insert the table to the web page at the div element under the "Parameters" section with the help of JQuery. Because these details are not relevant to WebGL programming, we will not explain them further.
8.2.4.2 Retrieving WebGL extensions
The next section of the else clause of Program 2 retrieves the names of WebGL extensions that are supported by the browser that runs the program. This is done by calling the getSupportedExtensions method of the WebGL context.
let extensions = gl.getSupportedExtensions();The rest of the section just converts the return value, which is a list of strings, into a bullet list and then inserts it to the web page at the div element under the "Extensions" section.
8.3 Program 3: Clearing the screen
The third program covers the commands are used to clear the canvas used to display WebGL's output. From now on, we shall refer to this canvas as the "screen" as it acts as the display device in our context. Clearning the screen removes whatever the screen was displaying previously, giving us a clean slate to draw new images. It is almost always the first thing we do when we want to update WebGL's output. The program's source code is available in the chapter-08/program-03 directory. The screenshots of the program is given below.
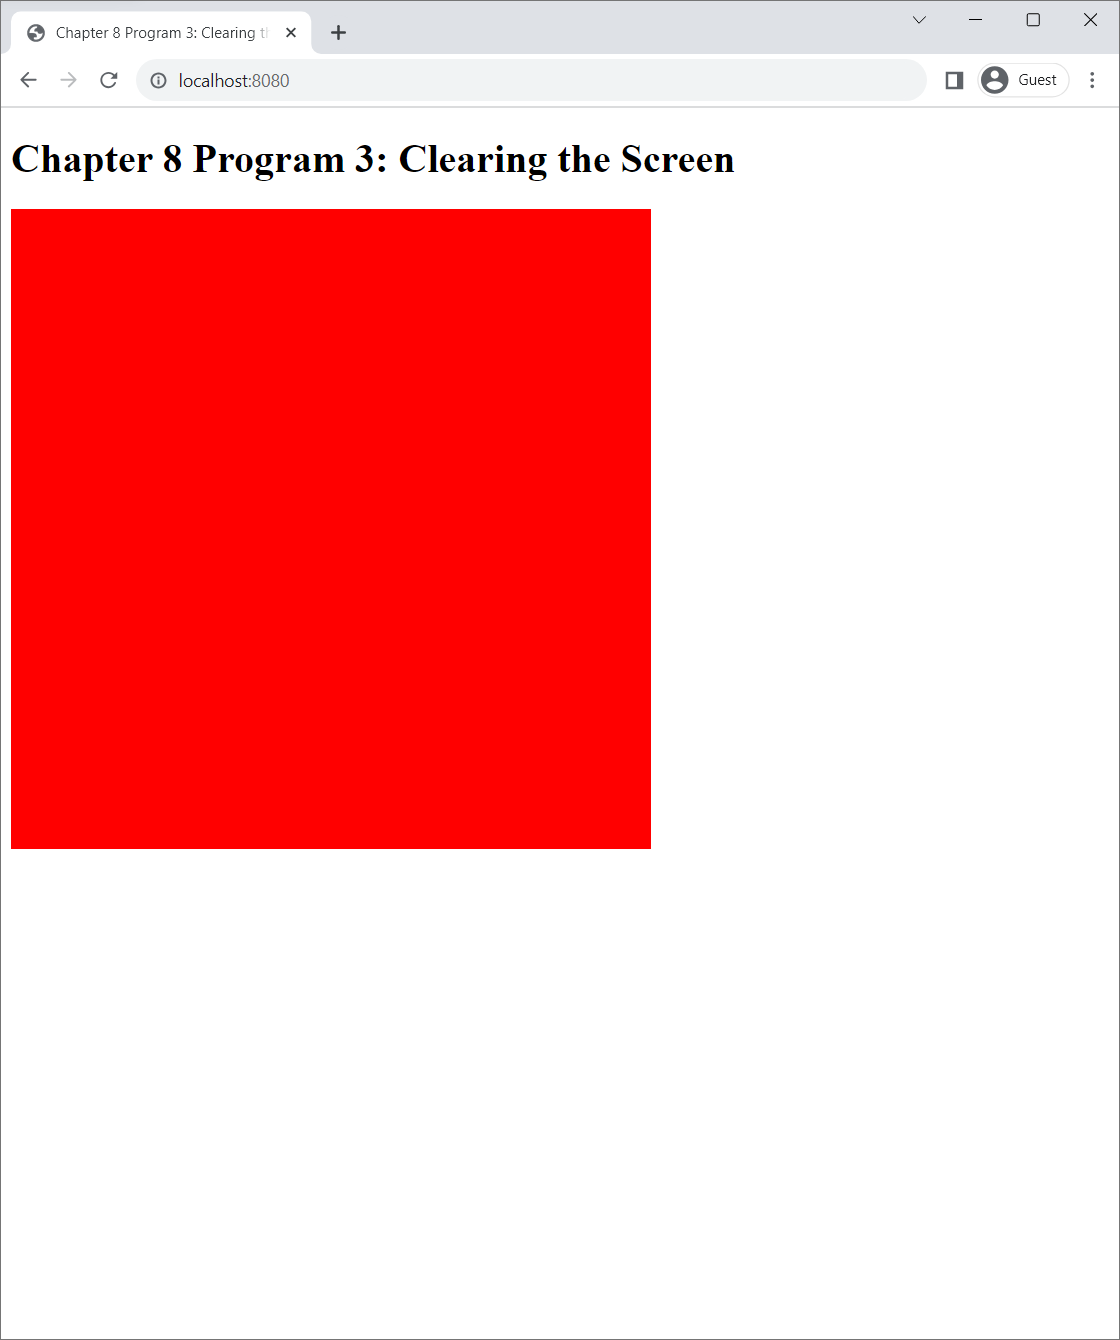
The main difference between this program and the previous ones is that the canvas is red instead of black. This is the result of the following two lines of code in the index.js file.
gl.clearColor(1.0, 0.0, 0.0, 1.0);
gl.clear(gl.COLOR_BUFFER_BIT);
The first line sets the color that WebGL will fill the screen with after clearning it with the clearColor method. The method receives four floating points numbers that represent the R, G, B, and A components of the color, where each number must be in the $[0,1]$ range. In Line 1, we specify the color $(1,0,0,1)$, which is red and opaque.
The second line actually clears the screen with the clear method. The specification for the argument to the method is quite complicated. In WebGL, What we refer to as the "screen" is made up of one or more buffers, where a buffer is an area of memory, typically on the GPU. WebGL maintains three buffers.
- The color buffer holds pixel colors.
- The depth buffer holds depth values used in the depth test. (See Section 7.2.5.)
- The stencil buffer holds values used in the stencil test. (Again, see Section 7.2.5.)
The color buffer is always present because there would be no images to display in the first place. The depth buffer and the stencil buffer are not present unless we enable the corresponding tests.
The clear method can be used to clear any combination of the above three buffers. What it receives as input is a bit field, an integer value whose bits represent a set of items. The bit field can be constructed by performing the bitwise-or | operation on the following GLenum values
gl.COLOR_BUFFER_BITgl.DEPTH_BUFFER_BITgl.STENCIL_BUFFER_BIT
For example, the second line, gl.clear(gl.COLOR_BUFFER_BIT), clears only the color buffer. To clear the color buffer and depth buffer at the same time, we would write:
gl.clear(gl.COLOR_BUFFER_BIT | gl.DEPTH_BUFFER_BIT);To clear all three buffers, we would write:
gl.clear(gl.COLOR_BUFFER_BIT | gl.DEPTH_BUFFER_BIT | gl.STENCIL_BUFFER_BIT);In this book, however, we will not use the stencil buffer and so will not clear it. Most of the time, we will clear the color buffer and the depth buffer together.
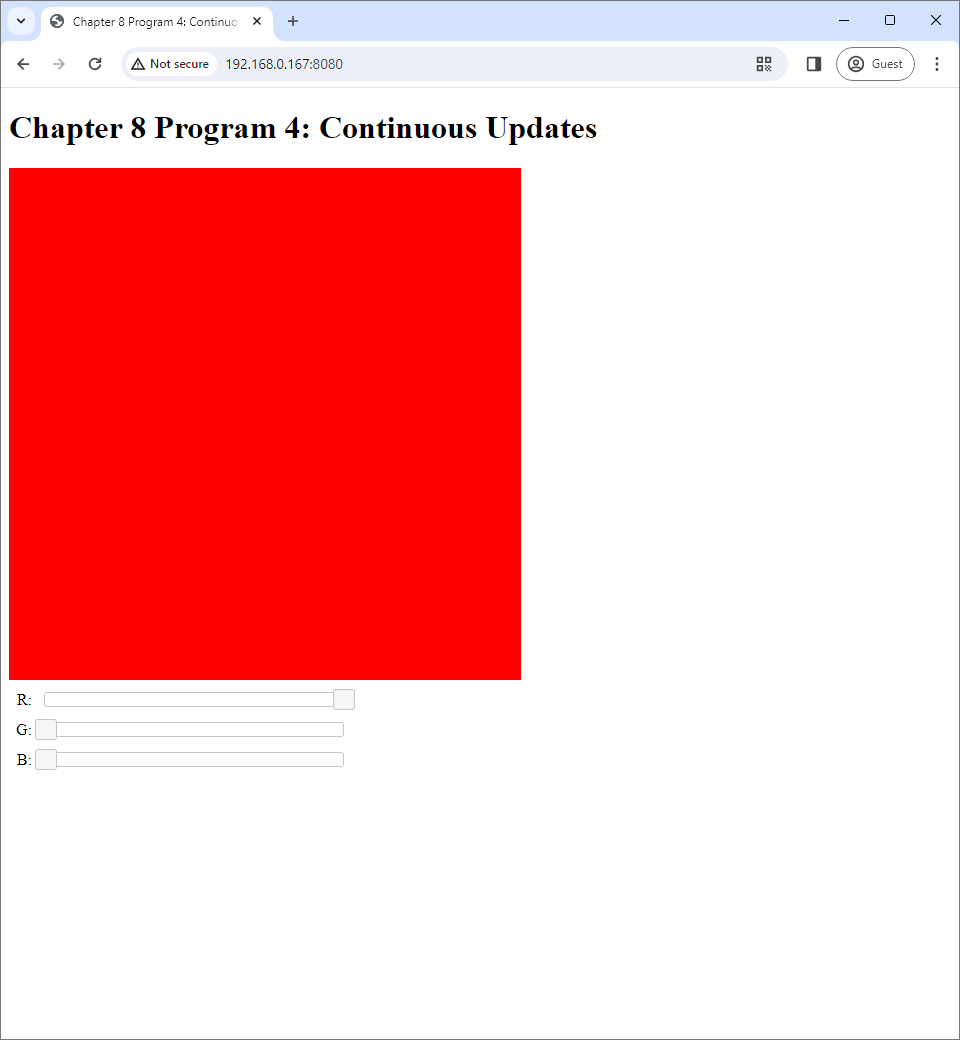
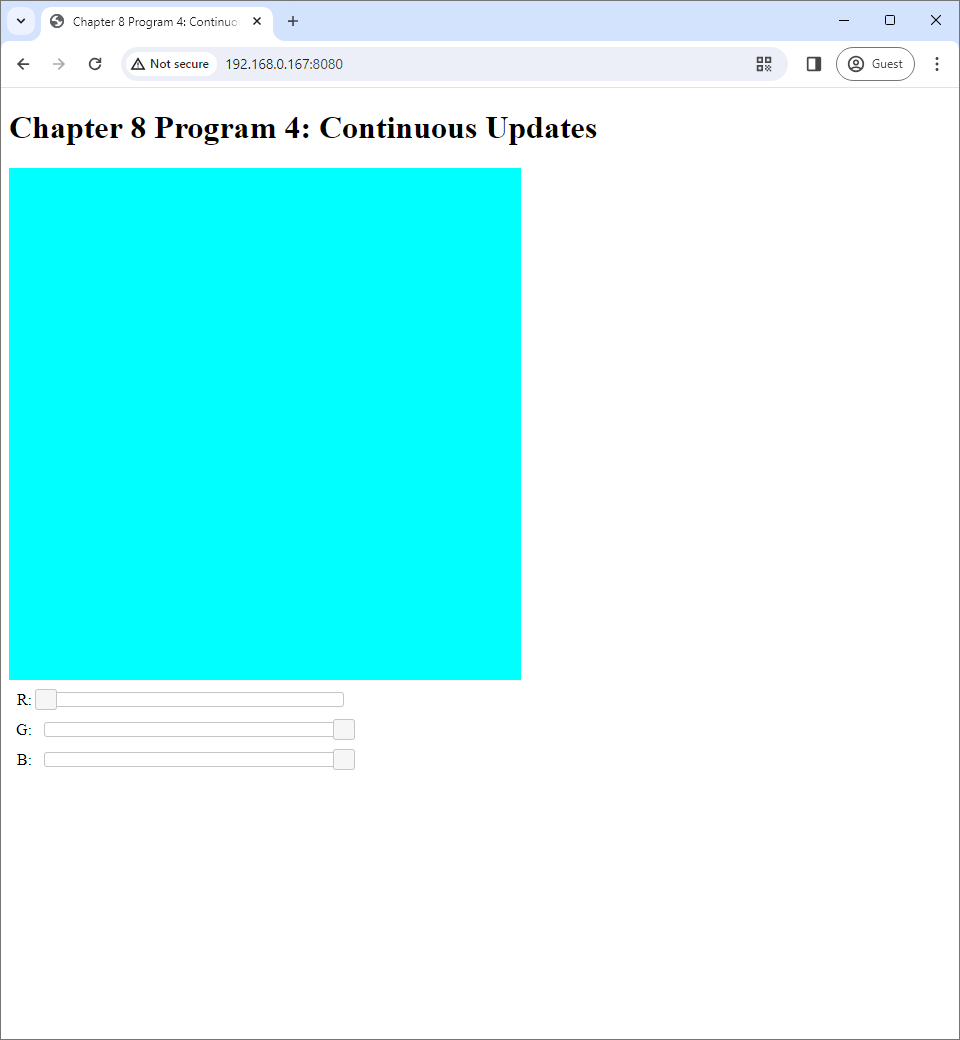
8.4 Program 4: Continuous updates
Most WebGL applications generate images that change with time. This might be because they have to show animations, or they must respond to the user's inputs from keyboard or mouse. This means that such applications must keeps generating a new image every so often. Program 4 shows how to do this, and its source code is available in the chapter-08/program-04 directory.
The web page of Program 4 looks similar to that of Program 3, excepth for the fact that, underneath the WebGL canvas, there are three slides corresponding to the R, G, and B channels. When you manipulate the sliders, the color of the WebGL canvas changes. This behavior is possible because the program updates the screen at a very high rate. Every time it does so, it sets the clear color to the values indicated by the sliders and clears the screen accordingly
 |
 |
| (a) | (b) |
Let us look at how the web page is set up. The body section of the program's index.html contains the following segment:
<canvas id="webglCanvas" style="border: none; background-color: black;" width="512" height="512">
<table cellpadding="5">
  <tr>
    <td style="text-align: right;">R:</td>
    <td width="300"><div id="rSlider"></div></td>
    </tr>
    <tr>
        <td style="text-align: right;">G:</td>
        <td width="300"><div id="gSlider"></div></td>
    </tr>
    <tr>
        <td style="text-align: right;">B:</td>
        <td width="300"><div id="bSlider"></div></td>
    </tr>
</table>
We see that there is a table containing three div elements named rSlider, gSlider, and bSlider. These divs are turned into sliders through the use of the JQuery UI library in the following code snippet in index.js.
let sliderNames = ["rSlider", "gSlider", "bSlider"];
let rgbSliders = sliderNames.map(name => $("#" + name).slider({
    min: 0,
    max: 255,
    value: 0
}));
rgbSliders[0].slider("value", 255);
In other words, we use JQuery to retrieve the divs by their names. We call the slider method to turn each div to a slider that can take value from 0 to 255, inclusive. (We will not cover how this method works in details because it is not the focus of the book. Please refer to the JQuery UI documentation for details.) Each slider's initial value is defaulted to zero. The sliders are stored in the rgbSliders list in such a way that rgbSliders[0] is the "R" slider, rgbSliders[0] the "G" slider, and rgbSliders[2] the "B" slider. The last line of the snippet sides the value of the R slider to 255, so that the initial color is red.
The next section of index.js retrieves the WebGL context like previous programs. However, the way the code uses the context is different. The context of the else clause that is run when the WebGL context's retrieval is successful is as follows:
function updateWebGL() {
  let rgb = rgbSliders.map(
    (rgbSlider) => rgbSlider.slider("value") / 255.0);
  gl.clearColor(rgb[0], rgb[1], rgb[2], 0.0);
  gl.clear(gl.COLOR_BUFFER_BIT);
  window.requestAnimationFrame(updateWebGL);
}

window.requestAnimationFrame(updateWebGL);
What we see is that we define a function called updateWebGL. Then, we feed it to the requestAnimationFrame method of the window object. For Javascript implementations that runs in web browsers, window is a built-in variable that contains an instance of the Window object that represents the browser window. the requestAnimationFrame receives a function, often referred to as a callback function, and the function would executed the next time the window is updated as a result of the monitor being refreshed.
The callback function must do two things to continously update the WebGL screen as time progresses. First, it must call WebGL functions to generate an image on the WebGL screen. Second, at the end of function, it must call window.requestAnimationFrame with itself so that same update can be executed again the next time the monitor refreshes. Hence, the code snippet above can be summarized as follow:
function updateWebGL() {
  // Step 1: Use WebGL to update the screen
    :
    :
    :

  // Step 2: Register the callback so that it is run again
  // the next time the monitor refreshes.
  window.requestAnimationFrame(updateWebGL);
}

window.requestAnimationFrame(updateWebGL);
Notice that we call window.requestAnimationFrame two times. One time inside the our callback function, updateWebGL, and another time outside the callback function. Both calls are necessary, but they serve different purposes. The call inside is responsible for maintaining a perpetual loop of screen updates. On the other hand, the call outside makes sure that the loop is started. Notice also that the loop create this way is "as fast as possible" in the sense that the next update is carried out at the next monitor refresh after the callback function has finished doing everything it needs to update the screen.
Now that we have discussed the high-level structure of the code snippet, let us look at how the screen update works in Program 4. The code that updates the screen is the first 4 lines of the updateWebGL call back function:
let rgb = rgbSliders.map(
  (rgbSlider) => rgbSlider.slider("value") / 255.0);
gl.clearColor(rgb[0], rgb[1], rgb[2], 0.0);
gl.clear(gl.COLOR_BUFFER_BIT);
The first two lines retrieve an RGB color from the sliders by issuing slider("value") to each of the three sliders. The retrieved valued is divided by 255.0 to convert it to a floating point number that takes value from 0 to 1. The retrieved color is then set as the WebGL clear color through gl.clearColor method that we just learned about in the last section. Lastly, we clear the screen with the gl.clear method.
It is very important to remember and familiarize yourself with the structure of Program 4 as it is the structure that we will be using in every program from now on.
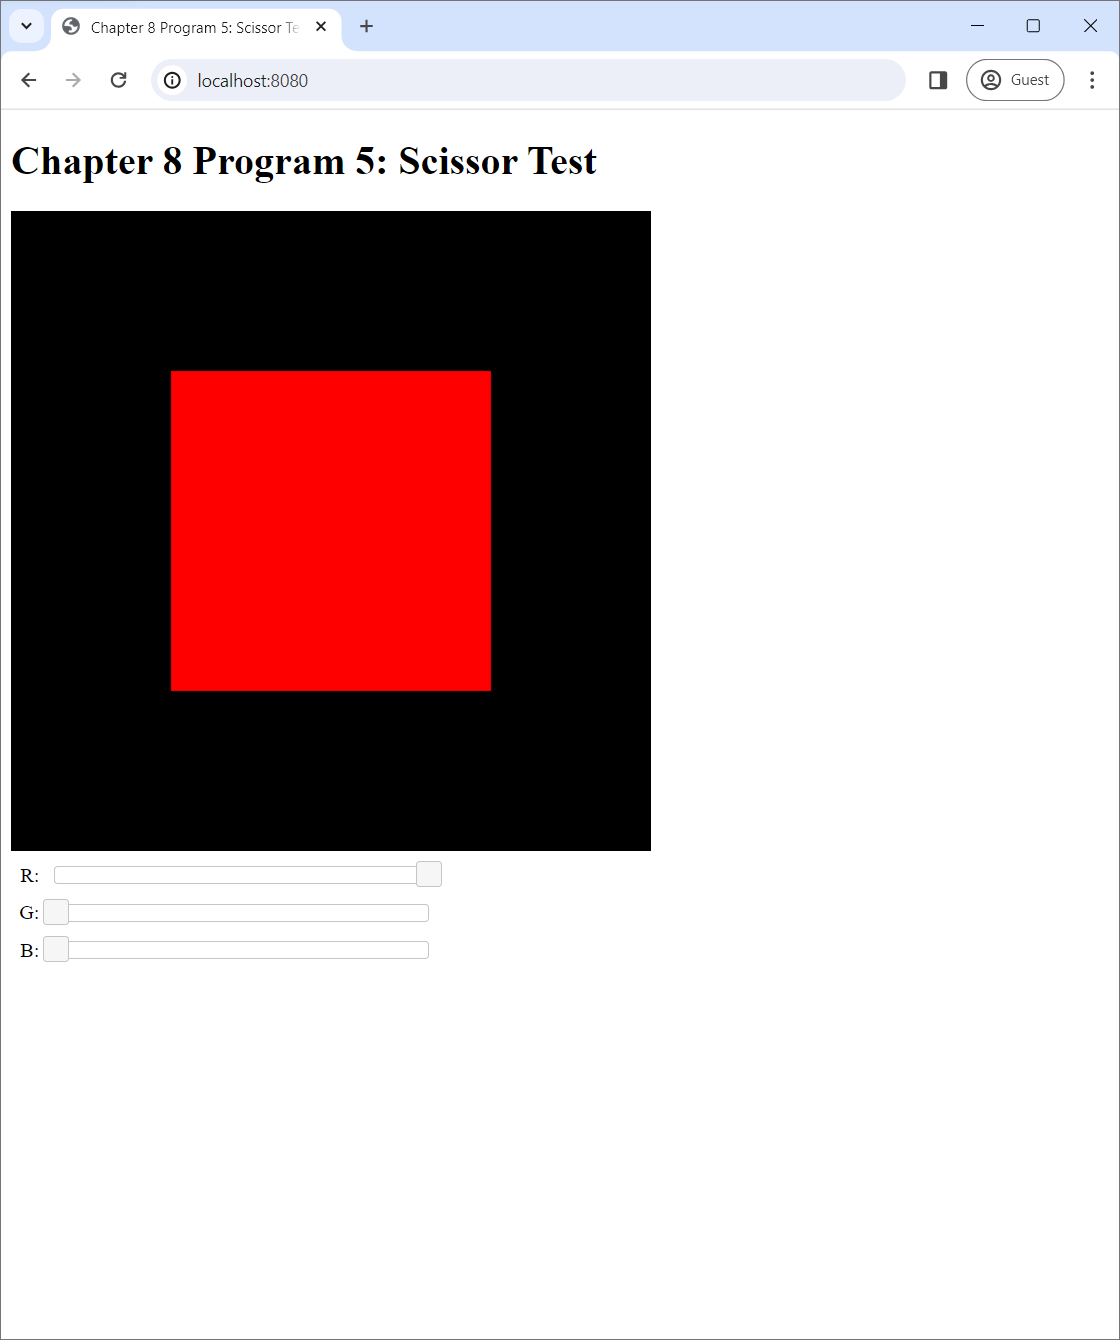
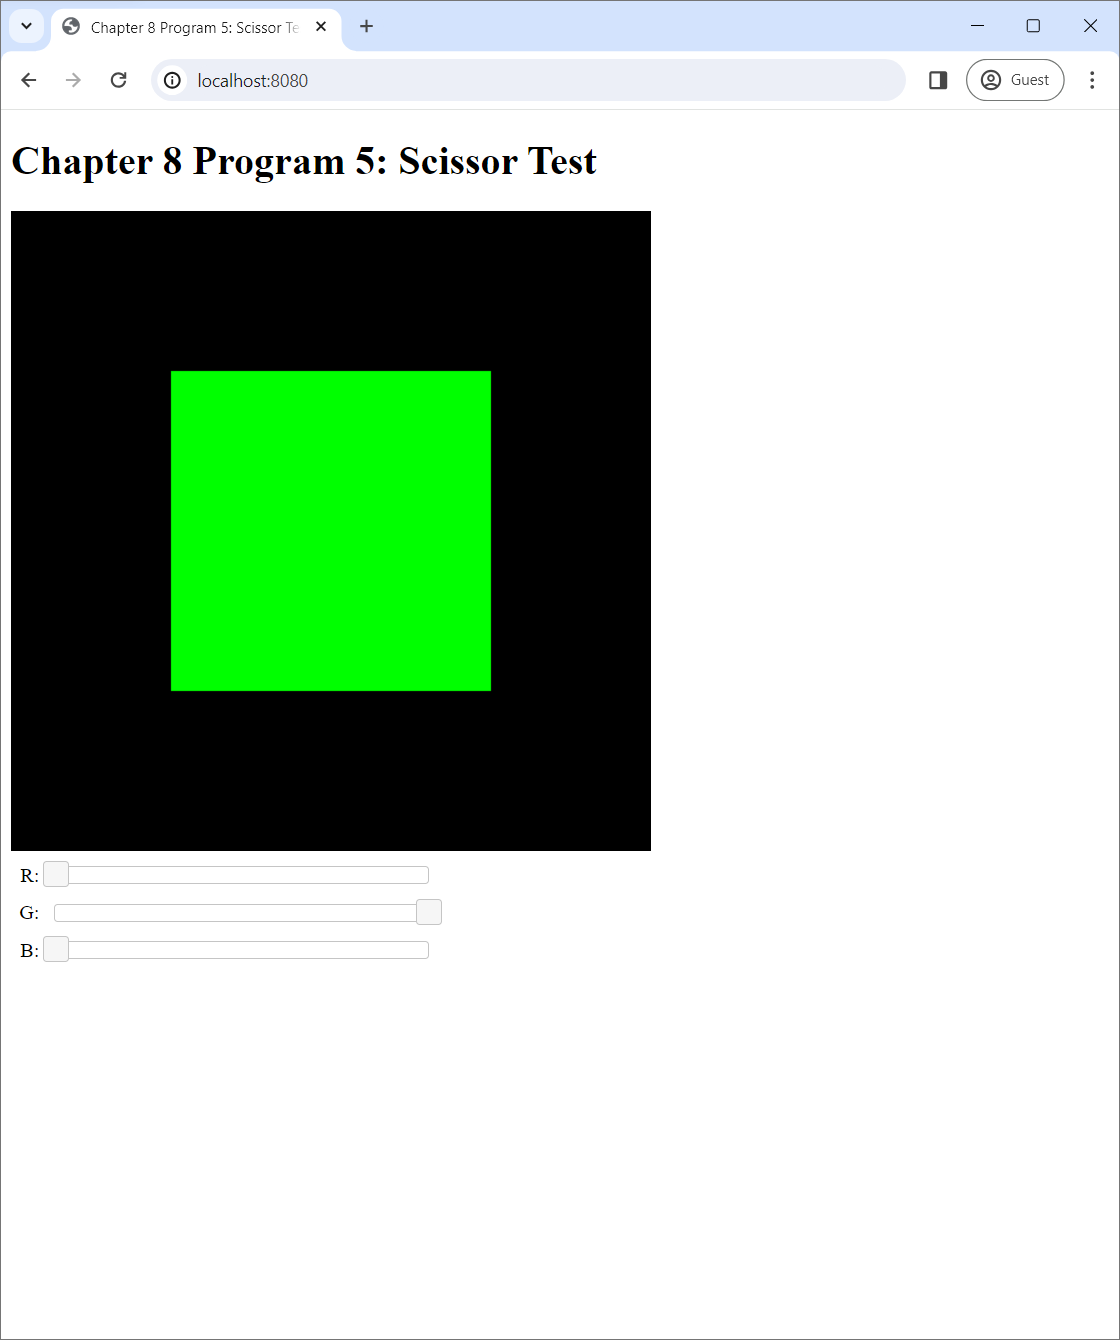
8.5 Program 5: Scissor Test
Recall from Section 7.2.5 that the "scrissor test" is one of the culling tests performed in the raster operation step of the graphics pipeline. What the scissor test does is quite simple. It discards all changes to that screen that are outside the rectangular area of the canvas that the user specifies. For example, we can see from the screenshots of Program 5 below that, by using the scissor test, we can "draw" a rectangle that is smaller than the whole screen whose color is determined by sliders that the user can manipulate. Under the hood, however, we are not drawing anything. Program 5 only clears the screen with the color specified by the sliders like Program 4 does, but it uses the scissor test to limit the affected area to a rectangle in the middle of the screen.
 |
 |
| (a) | (a) |
Program 5's index.html file is identical to that of Program 4 (save for the web page's title and header). The index.js file is almost the same as well, but the updateWebGL function now has code to set up the scissor test.
function updateWebGL() {
  let rgb = rgbSliders.map((rgbSlider) => rgbSlider.slider("value") / 255.0);

  gl.enable(gl.SCISSOR_TEST);
  gl.scissor(128,128,256,256);

  gl.clearColor(rgb[0], rgb[1], rgb[2], 0.0);
  gl.clear(gl.COLOR_BUFFER_BIT);

  window.requestAnimationFrame(updateWebGL);
}
By default, the scissor test is not enabled by default, so WebGL functions can affect all parts of the screen. To use the scissor test, we need to enable it with gl.enable(gl.SCISSOR_TEST).
The scissor method sets up the scissor box: the rectangle area inside the screen where the effects of all WebGL functions are limited to. The function takes 4 parameters: x, y, width, and height. Here, x and y are coordinates of top-left corner of the rectangle relative to the top-left corner of the canvas, and width and height are the horizontal length and the verical length of the rectangle, respectively. The unit of measurement for all parameters are "pixels." Figure 8.6 graphically describes the meaning of the parameters.
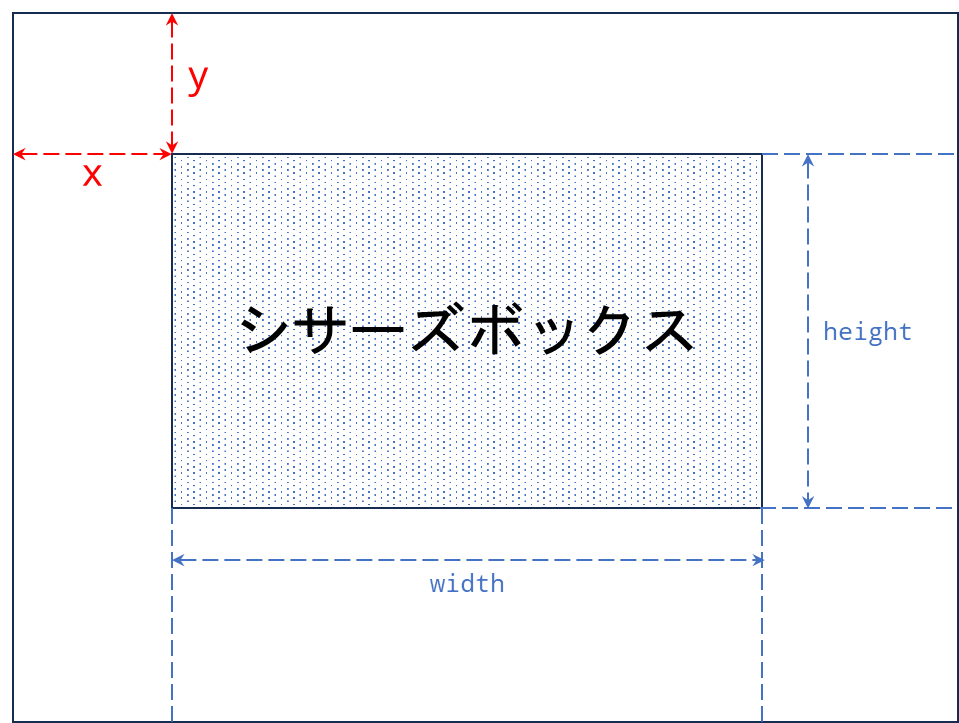
scissor function.In the code, gl.scissor(128, 128, 256, 256) sets the scissor box to be a square whose top-right corner is 128 pixels to the right and the 128 pixels below the top-right corner of the WebGL canvas and whose side lengths are 128 pixels. This square is 1/4 of the canvas's total area and is right in the middle of the canvas.
The scissor test is useful creating visual effects. As an example, it can be used to create a transition effect where the screen changes from one image to another in such a way that the second image grows larger over time until it fills the whole screen. Another example is the split screen effect in which we draw to the screen multiple times, each time with the right scissor test to limit which part of the screen is affected.
Summary
- A WebGL application needs a
canvaselement to act as a place WebGL can draw to. We also refer to the canvas element as the screen. - The first step in any WebGL application is to retrieve a WebGL context.
- A WebGL context is an object of the
WebGLRenderingContextclass. - It can be retieved by calling
getContext("webgl2")on the canvas element. - In this book, we typically store the WebGL context in a variabled named
gl.
- A WebGL context is an object of the
- Functionality of the graphics pipeline can be accessed through methods of the WebGL context such as
gl.enable,gl.clear, andgl.scissor.- The methods typically correspond to C functions in the OpenGL API. The functions have the same names as the methods, but they have "
gl" as prefixes. So,gl.enable,gl.clear, andgl.scissorcorrespond to C functions whose names areglEnable,glClear, andglScissor, respectively. - One way to get a documentation for a WebGL method is to capitalize the function's name and add
glat the front to get the name of the corresponding C function. Then, one can search for the C function with a search engine.
- The methods typically correspond to C functions in the OpenGL API. The functions have the same names as the methods, but they have "
- A number of fields of the WebGL context are contants that are used exclusively as parameter values to WebGL-related methods.
- These fields' names are in capital letters, and words are separated by underscores:
gl.DEPTH_TEST,gl.MAX_TEXTURE_SIZE, andgl.LINE_WIDTH. - Such fields have numerical values of type
GLEnum, which is a synnonym for theunsigned longtype.
- These fields' names are in capital letters, and words are separated by underscores:
- A WebGL context maintains a number of WebGL parameters.
- A WebGL parameter is a value that represents a setting in the WebGL implementation; for examples, the maximum size of a texture, the width of the line primitive, and whether a certain test is enabled or not.
- Some WebGL parameters (i.e., the maximum size of a texture) are constants, but some can change over time (i.e., the width of the line primitive) due to the user's action.
- The value of a parameter can be retrieved through the
gl.getParametermethod, which takes as input aGLEnumvalue that represents the parameter's name. For example, to check whether the depth test is currently enabled or not, one can look at the return value ofgl.getParameter(gl.DEPTH_TEST).
- Functionalities that are not part of the standard WebGL specification are packaged into bundles called WebGL extensions.
- WebGL extensions are referred to by names such as
WEBGL_debug_renderer_info,WEBGL_multi_draw,OES_texture_float_linear, etc. - We can call
gl.getSupportedExtensions()to get a list of names of extensions supported by the browser we are using. - The
gl.getExtensionmethod can be used to retrieve a WebGL extension by name.
- WebGL extensions are referred to by names such as
- The first step in using WebGL to create an image is to "clear" the screen.
- Clearing the screen means changing all pixels of certain buffers to a specific value, erasing all previous contents.
- WebGL maintains three buffers:
- The color buffer contains the colors of the pixels of the screen.
- The depth buffer contains the depth values of the pixels, and it is used for the depth test.
- The stencil buffer is used for the stencil test, which we will not cover in this book.
- Use the
gl.clearmethod to clear the screen. - The method takes a bit field constructed by performing the "bitwise-or" operation on three
GLEnumvalues that represent the three buffers:gl.COLOR_BUFFER_BIT,gl.DEPTH_BUFFER_BIT, andgl.STENCIL_BUFFER_BIT. - The color that is used to fill the color buffer can be specified by the
gl.clearColormethod. It accepts 4 floating point values as arguments, and they represent an RGBA color.
- Use the
requestionAnimationFrameof theWindowto create a perpetual loop that continuosly draw a new image to the WebGL canvas after the previous one is finished.- First, create a function that uses WebGL to draw the image. At the end of this function call
requestAnimationFramewith the function's name as argument. - After the defining the function, call
requestAnimationFramewith the function's name to schedule the function to be run for the first time, thereby starting the loop.
- First, create a function that uses WebGL to draw the image. At the end of this function call
- The scissor test is a culling test in the raster operation step of the graphics pipeline.
- It limits all changes to the canvas to a rentangular area called the scissor box.
- The scissor test is not enabled by default. To use it, one need to enable it with
gl.enable(gl.SCISSOR_TEST). - Use
gl.scissorto specify the scissor box.
-
You can check whether your web browser support WebGL 2.0 or not by checking the following web page.