14 Abstracting OpenGL
We learned in the past few chapters of the essential components of a GLSL program: vertex shader, fragment shader, vertex attributes, uniform variables, and varying variables. We also learned that rendering a mesh involves multiple steps. We need to create buffers to store vertex data. Then, we need to create a buffer to store the vertex indices that make up primitives. We then use a GLSL program and setup all of its vertex attributes and uniform variables. Finally, we must bind the index buffer and issue a drawing command.
Because of all the above details, we can see that it can be hard to manage those objects, especially in more complex WebGL applications where we might have multiple GLSL programs and multiple meshes. One bad aspect of the way we have written the code so far is that things are not properly encapsulated. This means that things that should be parts of a larger object are not bundled together. For example, when we create a mesh, we need to create two variables: one for the vertex buffer and another for the index buffer. There is nothing to indicate that these two buffers should always be used together, and so the programmer has to keep track of this fact themself.
Another worrying aspect is that the programmer must also keep track of the vertex attributes and uniform variables of all GLSL programs. Because the programmer can name these variables in any way they want, there can be too many names to remember, and this can lead to bugs that are hard to identify. Fortunately, it turns out that GLSL programs in generally tend to use only a small set of vertex attributes. So, we can reduce the cognitive load on the programmer by naming attributes with the same semantics with the same names.
Still, because different GLSL programs serve different purposes, some programs might use one particular vertex attribute (for examples, the vertex color) while others do not. As a result, we need the ability to identify which vertex attributes are present in a GLSL program.
This chapter presents a way to solve the above programs by creating new abstractions (i.e., classes) for GLSL programs and colored meshes. These abstractions are what the author personally use in his personal projects, and they will be use in later chapters of the book. We choose to introduce them here because he thinks he would not be able to manage WebGL's complexity without them. A decent programmer must know the limit of their cognitive capacity and introduce appropriate abstractions to make their life easier.
14.1 An abstraction for GLSL programs
WebGL already has an abstraction for GLSL programs: the WebGLProgram class. However, the author finds that they are not the most convenient to use. In particular, WebGLProgram does not have any information about the vertex attributes or the uniforms of the GLSL program it represents. Moreover, working with vertex attributes and uniforms require issuing at least two WebGL commands. First, we must issue one to get the variable's location. Only then we can issue another command to do what we want with the variable itself.
14.1.1 GlProgram
To deal with the above problem, we introduce a new class called GlProgram that encapsulates a GLSL program together with its vertex attributes and uniforms. The source code for the class is available in the program.js file in the chapter-14/program-01/src directory. Before going into the details of how the class is implemented, let us see what it accomplishes. Using the code we have developed so far in the book, a typical sequence of commands when we use a GLSL program to render some primitives is as follows.
// Step 1: Create the program.
this.program = createGlslProgram(
  this.gl, vertexShaderSource, fragmentShaderSource);

// Step 2: Use programs.
let self = this;
useProgram(this.gl, this.program, () => {
  // Step 3: Set the values of uniforms.
  let centerLocation = self.gl.getUniformLocation(self.program, "center");
  self.gl.uniform2f(centerLocation, centerX, centerY);

  let scaleLocation = self.gl.getUniformLocation(self.program, "scale");
  self.gl.uniform1f(scaleLocation, scale);

  // Step 4: Set up the vertex attributes.
  setupVertexAttribute(
    self.gl, self.program, "vert_position", self.vertexBuffer, 2, 4*5, 0);
  setupVertexAttribute(
    self.gl, self.program, "vert_color", self.vertexBuffer, 3, 4*5, 4*2);

  // Step 5: Call drawElements to draw the primitives.
  drawElements(self.gl, self.indexBuffer, self.gl.TRIANGLES, 6, 0);
});
Using the GlProgram class, we can shorten the code above.
// Step 1: Create the program
this.program = new GlProgram(
  this.gl, vertexShaderSource, fragmentShaderSource);

// Step 2: Use the program.
let self = this;
this.program.use(() => {
  // Step 3: Set the values of uniforms.
  self.program.uniform("center")?.set2Float(centerX, centerY);
  self.program.uniform("scale")?.set1Float(scale);

  // Step 4: Set up the vertex attributes.
  self.program.attribute("vert_position")?.setup(
    self.vertexBuffer, 2, 4*5, 0);
  self.program.attribute("vert_color")?.setup(
    self.vertexBuffer, 3, 4*5, 4*2);

  // Step 5: Call drawElements to draw the primitives.
  drawElements(self.gl, self.indexBuffer, self.gl.TRIANGLES, 6, 0);
});
There are cosmetic changes such as how the program field is initialized and the fact that the useProgram function has become a method. The substantive changes, though, are how the uniforms and vertex attributes are accessed. The GlProgram class has the uniform and attribute methods that take a name and returns an object representing a uniform or an attribute, respectively. However, the methods are written so that they return null if there are uniforms or attributes with the given name. This is why we use the optional chaining operator (?.) to invoke the methods (i.e., set2Float, set1Float, and setup) of these objects.
The author argues that the benefits of the new abstraction is not only that the code becomes a little shorter, but also the fact that the vertex attributes and the uniforms are accessed somewhat like fields of the program object. It makes the code easier to read and aligned with the fact that attributes are uniforms are part of a GLSL program.
Another benefits that is not obvious from reading the code is that it eases shader debugging. Debugging any code involves changing the code a little bit and running the changed code to try to discover the root cause of the bug or test a hypothesis. When we debug a GLSL shader, we often rewrite the code so that some vertex attributes or uniforms becomes unused so that the shader becomes simpler and easier to understand. The problem is that, when such an object becomes unused, the GLSL compiler will automatically removes it completely from the GLSL program, and that means that any attempts to access them would cause an error. For example, if we change the code so that it temporarily does not use the center uniform, then the self.gl.getUniformLocation(self.program, "center") command would return null instead of valid WebGLUniformLocation object. Then, the subsequent self.gl.uniform2f(centerLocation, centerX, centerY); would result in an error. It is annoying to have to modify the Javascript code every time we make such changes to the shader. On the other hand, the line
self.program.uniform("center")?.set2Float(centerX, centerY);automatically skips the setting of the uniform if it does not exist, and this allows us to focus more on the GLSL code rather than modifying the Javascript host code to avoid errors.
14.1.3 Overall structure
Let's take a look at the overall structure of the GlProgram class, whose source code is available in the program.js file of Program 1 of Chapter 14. The class has a constructor and the following three methods:
use,attribute, anduniform.
attribute and uniform are accessors for the vertex attributes and uniforms, which we just mentioned earlier. The use does what its name suggest and serves the same function as the useProgram function we have been utilizing up until this point.
The class has four fields: gl, glObject, attributes, and uniforms. The gl field wholes the WebGLRenderingContext through which all WebGL commands are issued. The glObject field holds the WebGLProgram object that the WebGL API provides when we create a GLSL program. The fields attributes and uniforms are Javascript Map that sends a name to an object representing an attribute or a uniform with that time. The constructor initialize the fields as follows.
export class GlProgram{
    constructor(gl, vertexShaderSource, fragmentShaderSource) {
        this.gl = gl;
        this.glObject = createGlslProgram(
          gl, vertexShaderSource, fragmentShaderSource);

        // Code that fills this.attributes.
        this.attributes = new Map();
           :
           :

        // Code that fills this.uniforms.
        this.uniforms = new Map();
           :
           :
    }
}
Like what we have done before, we create an instance of WebGLProgram with the createGlslProgram function and save the return value in the glObject field. The atttributes and uniforms fields initially hold two new empty Maps. We shall discuss how the maps are filled in the next subsections.
The use method is just a reimplementation of the useProgram function.
use(code) {
  this.gl.useProgram(this.glObject);
  code();
  this.gl.useProgram(null);
}
With the explanation of the easy parts completed, let us discuss how we model vertex attributes and uniform variables.
14.1.4 Modeling vertex attributes
Our goal here is to create an object that represents each vertex attribute of a GLSL program so that we may have a nicer interface to work with. As a result, we need to extract information about vertex attributes from a WebGLProgram object. The first bit of information we need is how many vertex attributes a program has. This can be objected using the getProgramParameter method of the WebGL context, passing the WebGLProgram instance and the contant ACTIVE_ATTRIBUTES as arguments. The method is used in the constructor of the GlProgram class as follows.
let numAttributes = gl.getProgramParameter(
  this.glObject, gl.ACTIVE_ATTRIBUTES);
WebGL refers to the vertex atrributes with integer indices from 0 to numAttributes-1, and it provides us a way to query information about a vertex attribute given its index. We shall use this mechanism inside the constructor of a GlAttribute object, which we create to model a vertex attribute. Before discussing the details of the class, let us see how the GlAttribute objects are instantiated.
this.attributes = new Map();
for (let index = 0; index < numAttributes; index++) {
  let attribute = new GlAttribute(gl, this, index);
  this.attributes.set(attribute.name, attribute);
}
Here, we create field called attributes that is a Javascript Map which allows us to refer to vertex attributes by their names. We then loop through the indices of the vertex attributs and create an instance of GlAttribute for each of the index. The created will have a field called name, which we can use when we add the object to the map. Once the loop has finished running, we can use the attributes field to implement the attribute method of the GlProgram class that we discuss in the last section as follows.
attribute(name) {
  if (this.attributes.has(name)) {
    return this.attributes.get(name);
  } else {
    return null;
  }
}
Now, let us discuss the implementation of the GlAttribute object itself. The following is the its constructor.
export class GlAttribute {
  constructor(gl, program, index) {
    this.gl = gl;
    this.program = program;
    this.index = index;

    let info = gl.getActiveAttrib(program.glObject, index);
    this.name = info.name;
    this.size = info.size;
    this.type = info.type;
    this.location = gl.getAttribLocation(program.glObject, this.name);
    this.enabled = false;
  }

  :
  :
}
The constructor accepts three arguments: the WebGL context, the GlProgram object to which this GlAttribute object belongs, and lastly the index of the vertex attribute. The first three lines of the constructor saves the arguments as fields. The rest of the constructor extracts and saves information about the vertex attribute itself.
First, we call the getAttiveAttrib method of the WebGL context, passing the WebGLProgram instance stored in the GlProgram object and the index of the vertex attribute as arguments. The method would return the WebGLActiveInfo, which has three fields.
nameis the name of the vertex attribute.sizeis the "size" of the field. It is 1 if the field is not an array, and the number of elements in the array if the field is an array.typeis the data type of each of the component of the field. These are WebGL-specific constants such asFLOAT,FLOAT_VEC2,FLOAT_VEC3,INT, andINT_VEC4, and so on.
WebGLActiveInfo as fields of the GlAttribute instance.
The next step is to retrieve the location of the vertex attribute. We have done this before in most programs in the previous chapters. However, this time, we do not specify the name of the vertex attribute ourselves but use the name we queried using the glActiveInfo method.
Lastly, we initialize the enabled field to false. This field keeps track whether the vertex attribute has been enabled using the enableVertexAttribArray method or not.
The class has two methods. The first is setEnabled, which we will not use directly most of the time.
setEnabled(enabled) {
    if (enabled) {
        this.gl.enableVertexAttribArray(this.location);
        this.enabled = true;
    } else {
        this.gl.glDisableVertexAttribArray(this.location);
        this.enabled = false;
    }
}
The argument enabled is a boolean that indicates whether the user wants to enable of disable the attribute. So, to enable, we call enable(true), and, to disable, we call enable(false). The other method is the setup method, which replaces the setupVertexAttribute function we have been using so far.
setup(buffer, size, stride, offset, type=null, normalized=false) {
  this.setEnabled(true);
  type = type || this.gl.FLOAT;
  let self = this;
  bindBuffer(this.gl, this.gl.ARRAY_BUFFER, buffer, () => {
    self.gl.vertexAttribPointer(
      self.location, size, type, normalized, stride, offset);
  });
}
With the setup method in place, we can succinctly setup vertex attributes as like we discussed in the last section.
self.program.attribute("vert_position")?.setup(
  self.vertexBuffer, 2, 4*5, 0);
self.program.attribute("vert_color")?.setup(
  self.vertexBuffer, 3, 4*5, 4*2);
14.1.5 Modeling uniform variables
The next thing to do is to model uniform variables in the same way we did with vertex attributes. The process to do this starts in the constructor of the GlProgram class that we showed, in an incomplete from, in the last section. The following is the code that fills the uniforms map that associates uniforms with their names.
let numUniforms = gl.getProgramParameter(this.glObject, gl.ACTIVE_UNIFORMS);
this.uniforms = new Map();
for (let index = 0; index < numUniforms; index++) {
  let uniform = new GlUniform(gl, this, index);
  this.uniforms.set(uniform.name, uniform);
}
What we did here is similar to what we did in the last section. First, we find out how many uniform variables the program has, and this is done by calling the getProgramParameter method with the ACTIVE_UNIFORMS constant.
let numUniforms = gl.getProgramParameter(this.glObject, gl.ACTIVE_UNIFORMS);Similar to vertex attributes, uniforms are indexed from $0$ to the number of uniforms minus one. Again, we iterate through the indices with the for loop and create a GlUniform object to represent the uniform with a given index. We then call the set method of the Map class to assiociate the newly created GlUniform object with the uniform's name.
Let us now look at the GlUniform class, which is also located in the program.js file. First, let us look at the constructor.
export class GlUniform {
  constructor(gl, program, index) {
    this.gl = gl;
    this.program = program;
    this.index = index;

    let info = gl.getActiveUniform(program.glObject, index);
    this.name = info.name;
    this.type = info.type;
    this.size = info.size;
    this.location = gl.getUniformLocation(program.glObject, this.name);
  }

  :
  :
}
Much like the constructor of GlAttribute, GlUniform's is given the WebGL context, a GlProgram instance, and the index of the uniform. After saving the input arguments as fields, we proceed to get information about the uniform by calling the getActiveUniform of the WebGL context, which is the uniform counterpart of the glAtiveAttrib method. The two method receives the same arguments (a WebGLProgram object and an index), and it returns the same thing (a WebGLActiveInfo object). We then proceed to save the information in the return value as fields. The last line of the constructor queries the location of the uniform using the name we fetched with getActiveUniorm method. Because a uniform does not require enabling like a vertex attribute, we do not need the enabled field like the GlUniform class.
The GlUniform class has more methods than the GlAttribute class. This is because there are WebGL context methods such as uniform1f, uniform2f, and so on to wrap. In this chapter, we wrap 8 methods that are used to set vector types with float or integer components. We list some of the wrapping methods below and refer the reader to the code repository for the full listing.
export class GlUniform {
  :
  :

  set1Int(x) {
    this.gl.uniform1i(this.location, x);
  }

  set2Int(x, y) {
    this.gl.uniform2i(this.location, x, y);
  }

  :
  :

  set1Float(x) {
    this.gl.uniform1f(this.location, x);
  }

  set2Float(x, y) {
    this.gl.uniform2f(this.location, x, y);
  }

  :
  :
}
With the above methods, we can assign uniforms of a GLSL program as follows.
  self.program.uniform("center")?.set2Float(centerX, centerY);
self.program.uniform("scale")?.set1Float(scale);
14.1.6 Program 1
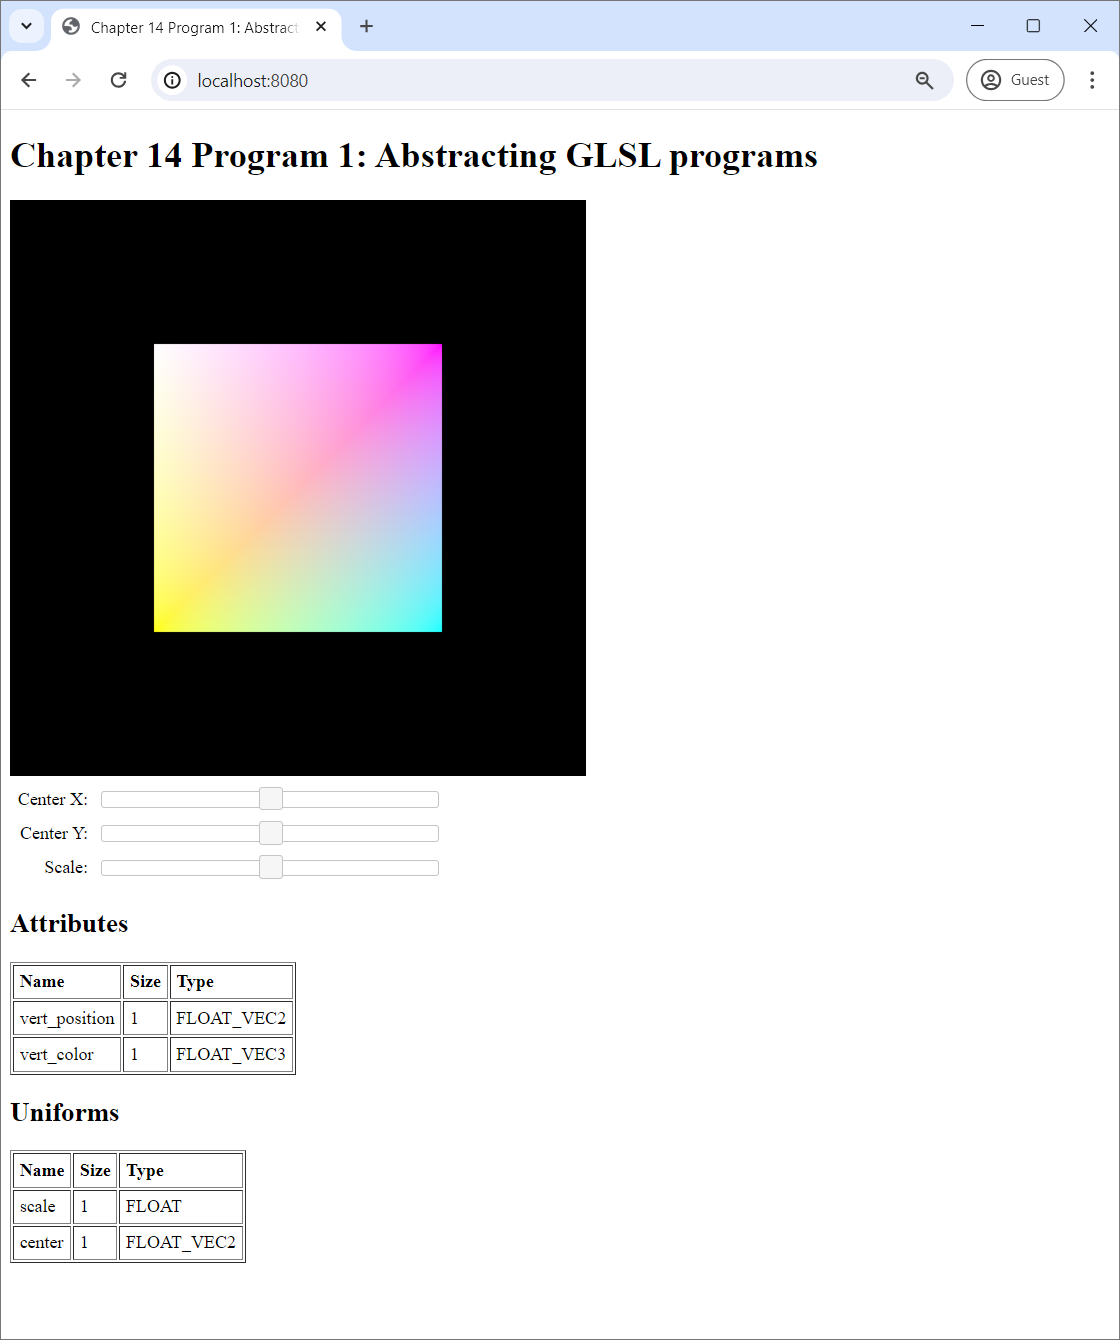
Program 1 from the code repository contains a demonstration of how the abstractions in the last few sections are used. As we can see from the screenshots in Figure 14.1, the screen shows a square painted with a gradient of colors. The user can manipulate the position and the size of the square through through the sliders below the screen. This makes it quite similar to Program 2 from the last chapter in terms of what it shows and Program 4 (also from the same chapter) in terms of what the user can do with the UI.
 |
 |
However, Program 1 is different from all the programs we have seen so far because it displays information about the GLSL program being used to update the screen. In particular, there are two tables listing the vertex attributes and uniforms that the GLSL program has. We can show such information now precisely because we took time to create objects to represent these variables.
If the reader is curious, they are welcome to read the index.js file to see how the shaders are implemented (not very different from the shaders from Chapter 13) and how we use the created GlAttribute and GlUniform objects to populate the tables (rather tedious and not very instructive). The main point of this section is refactoring: introducing a new way to do the same thing we did before so that we have a better foundation for more complex programs later.
14.2 An abstraction for colored meshes
Recall that a mesh is a collection of vertices that are connected to form a number of primitives. Operationally, all the meshes we have worked with so far are represented by two buffers. One is a buffer that holds vertex attributes, and we refer to this buffer as the "vertex buffer." The other stores the indices of vertices that are to be connected together, ad we refer to it as the "index buffer". In all previous programs, the buffers are specified independently, and there are no indications that they are parts of the same mesh. In this section, we introduce a new class that bundles the two buffers together so that there can be no confusion to which vertex buffer is to be used with with index buffer.
14.2.1 PosColMesh
So far, all meshes we have worked with have at most two vertex attributes. The first is the 3D position of each vertex, which is mandatory. The second is the color of each vertex, which is optional. In later chapters, we will introduce more attributes such as the texture coordinates and the normal vector. However, in the next few chapters, we will only deal with vertex color. As a result, the new class represents colored meshes and is aptly called PosColMesh, where Pos stands for "position," and Col stands for "color." The source code for the class is available in the pos-col-mesh.js file in the chapter-14/program-02/src directory of the book's code repository.
Again, before going into how the class is implemented, let's see how it is used first. In previous programs, we intiialize the vertex and index buffer in a method called createBuffers, which is called by the run method, the entry point of our application. With the new class, we create a mesh instead of buffers, so the method is renamed to createMesh. Its source code is reproduced below.
createMesh() {
  let meshBuilder = new PosColMeshBuilder(this.gl);

  meshBuilder
    .setColor(1.0, 1.0, 0.0, 1.0)
    .addVertex(-0.5, -0.5, 0.0)
    .setColor(0.0,  1.0, 1.0, 1.0)
    .addVertex(0.5, -0.5, 0.0)
    .setColor(1.0,  0.0, 1.0, 1.0)
    .addVertex(0.5, 0.5, 0.0)
    .setColor(1.0, 1.0, 1.0, 1.0)
    .addVertex(-0.5, 0.5, 0.0);

  meshBuilder
    .addIndices(0, 1, 2)
    .addIndices(0, 2, 3);

  this.mesh = meshBuilder.build();
}
The reader can see that we do no directly create the mesh. Instead, we create an instance of PosColMeshBuilder, a class specifically designed to "build" PosColMesh. The class has methods such as setColor, addVertex, and addIndices that can be used to add information, piece by piece, to the mesh being built. After we have specified all the vertex and index data, we call the build method to get an instance of PosColMesh, which we keep as a field of the application class. For those who are familiar with object-oriented programming, this is an instance of the builder pattern from the Gang of Four book.
The code becomes somewhat longer than those that we used to create buffers in previous programs. However, the author argues that it is much easier to read. Instead of seeing a bunch of numbers like in previous programs, we can easily read the vertex positions, the vertex colors, and the indices that make up the triangles from the code.
It becomes easier to render the mesh using the new class. The relevent code in the updateWebGL method is as follows.
this.program.use(() => {
    self.program.uniform("center")?.set3Float(centerX, centerY, 0.0);
    self.program.uniform("scale")?.set1Float(scale);
    self.mesh.draw(self.program);
});
In previous programs, we need to use the vertex buffer to set up attribute variables. We also need to call drawElements with the index buffer to do the rendering. With the new class, all of these statements have been moved into the draw method of the PosColMesh, and so rendering becomes much simpler. The result of using the PosColMesh class to represent and render mesh can be seen in the web page of Program 2, whose screenshot is given below.
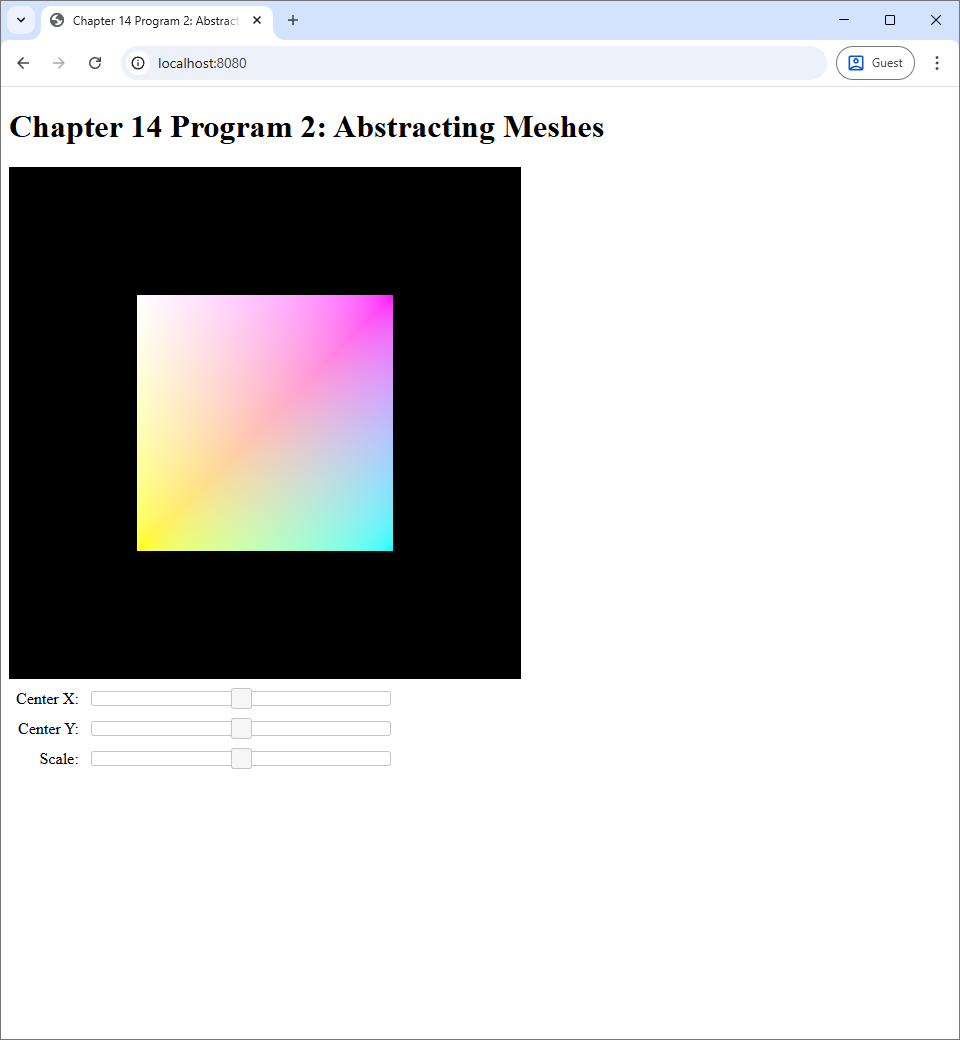 |
What we see is the same mesh that we saw in Program 1, but now the mesh was built differently.
14.2.2 Implementation of PosColMesh
Let's see how the PosColMesh class is implemented. It is located in the pos-col-mesh.js file in the chapter-14/program-2/src directory of the book's code repository. The class itself is quite simple. It has a constructor, which is a little lengthy, and 3 short methods: setupVertexAttributes, drawElements, and draw. Most of the time, the only method we need to use is the last one, which draws the entire mesh, and t is implemented by calling the first two in succession. However, we expose these two methods so that the class's users can do more advanced things such as drawing the meshes multiple times after setting up the attribute variables once.
Let us start with the constructor, whose code is reproduced below.
constructor(gl, positionData, colorData, indexData, primitiveType=null) {
  if (primitiveType === null) {
    primitiveType = gl.TRIANGLES;
  }

  if (primitiveType != gl.POINTS && primitiveType != gl.LINES && primitiveType != gl.TRIANGLES) {
    throw Error(`Primitive type ${primitiveType} is not supported.`);
  }

  this.gl = gl;
  this.positionBuffer = createVertexBuffer(this.gl, new Float32Array(positionData));
  this.colorBuffer = createVertexBuffer(this.gl, new Float32Array(colorData));
  this.indexBuffer = createIndexBuffer(this.gl, new Int32Array(indexData));

  this.numVertices = Math.floor(positionData.length / 3);
  this.numIndices = indexData.length;
  this.primitiveType = primitiveType;
}
The constructor takes quite a number of parameters, which is not at all surprising for something as complicated as a colored mesh. As with almost all classes we created in this book, the first parameter gl is the WebGL context that we will use to issue WebGL commands. The next two parameters, positionData and colorData, are data that will constitute the vertex attributes, and they should be arrays of floating point numbers. We expect the length of positionData to be multiples of three because we want to represent 3D meshes. (Note though that we will work with 2D meshes almost exclusively in the next few chapters. However, we can think of a 2D mesh as a 3D mesh where the $z$-components of all vertices are the same.) We expect the length of colorData to be multiples of four because we would like to represent colors in the RGBA format. The indexData parameter should be a list containing vertex indices that we will used to form primitives. Lastly, we have the primitiveType, which should contain the WebGL constant that indicates the type of primitives that the mesh should be built from. The parameter has a default value of null, which the constructor would convert to gl.TRIANGLES immediately.
if (primitiveType === null) {
  primitiveType = gl.TRIANGLES;
}
So, if the user does not specify a primitive type, the class would default to triangles. The next if statement in the constructor limits the allowed primitive types of only points, lines, and triangles for simplicity.
The next four lines create assigns the main fields of the class. We save the WebGL context and then create three buffers: one for the vertex positions, one for the vertex colors, and one for the vertex indices.
this.gl = gl;
this.positionBuffer = createVertexBuffer(this.gl, new Float32Array(positionData));
this.colorBuffer = createVertexBuffer(this.gl, new Float32Array(colorData));
this.indexBuffer = createIndexBuffer(this.gl, new Int32Array(indexData));
The createVertexBuffer and createIndexBuffer methods are the same ones used in previous programs, and their sources are located in the vertex-index-buffer.js file. Lastly, we calculate the number of vertices and indices and save them as fields.
this.numVertices = Math.floor(positionData.length / 3);
this.numIndices = indexData.length;
Next, let's look at the setupVertexAttributes method. This method takes a GlProgram object and try to set up the attributes variables of the program with the position and color buffers.
setupVertexAttributes(program,
    vertPositionName="vert_position", vertColorName="vert_color") {
  program.attribute(vertPositionName)?.setup(this.positionBuffer, 3, 4*3, 0);
  program.attribute(vertColorName)?.setup(this.colorBuffer, 4, 4*4, 0);
}
Notice that the user can change the name of the attribute variables by specifying the vertPositionName and vertPositionColor parameters. However, for most of the programs in this book, we will use the default names vert_color and vert_color, so we will not need to specify the names when we use this method.
The drawElements method is the wrapper of the drawElements function that we have been using in the last programs. It basically provides the default values to the arguments so that, when the method is called with no arguments specified, all the primitives of the mesh is rendered.
drawElements(mode=null, count=null, offset=0) {
  if (mode === null) {
    mode = this.primitiveType;
  }
  if (count === null) {
    count = this.numIndices;
  }
  drawElements(this.gl, this.indexBuffer, mode, count, offset);
}
Lastly, let us look at the draw method, which is basically calls the previous two methods in succession. In other words, in one step, it sets up the attribute variables to use the vertex buffers of the mesh, and then draws all the primitives.
draw(program,
    vertPositionName="vert_position",
    vertColorName="vert_color",
    mode=null, count=null, offset=0) {
  this.setupVertexAttributes(program, vertPositionName, vertColorName);
  this.drawElements(mode, count, offset);
}
By specifying the parameters to values other than the default ones, the user can customizes the method calls to change the attribute variable names or to render the mesh partially.
14.2.3 PosColMeshBuilder
Next, we look at the PosColMeshBuilder class, a helper class that makes creating a colored mesh more intuitive. Let us see how the class is supposed to be used. The first thing to do is to call the constructor to create an instance of the builder class. The last thing with the class to do is to call its build method to get an instance of PosColMesh. Between the calls to the constructor and build, the user can call the builder's methods to specify various aspects of the mesh. So, a code block that uses the class to build a mesh may look lile the following.
let builder = new PosColMeshBuilder(this.gl);
  :
  : // Call builder methods to specify meshes.
  :
let mesh = builder.build();
There are five methods for specifying the mesh.
setPrimitiveType(primitiveType)is used to specify the type of primitives that make up the mesh. The argument can be eithergl.POINTS,gl.LINES, orgl.TRIANGLES. If the method is not called at all, the primitive type is defauled to triangles.setColor(r, g, b, a)is used to set the "current" color of the builder. The current color that will be assigned to each new vertex added by the next method. The current color is initially white (RGBA = $(1,1,1,1)$).addVertex(x, y, z)adds a new vertex with the positions specified by the three arguments. The color of the new vertex will be the current color that was last set by thesetColormethod.addIndex(index)adds a new vertex index to the index buffer.- Lastly,
addIndices(...indices)adds multiple vertex indices to the index buffer. It is equivalent to callingaddIndexmultiple times.
All of the above methods return the build instance, so we can chain the method calls to make them easier. To see what this means, let's see some examples. The following code builds a red triangle.
let builder = new PosColMeshBuilder(this.gl);
builder
  .setColor(1.0, 0.0, 0.0, 1.0)  // Make the current color red.
  .addVertex(-1.0, -1.0, 0.0)    // Vertex #0
  .addVertex(1.0, -1.0, 0.0)     // Vertex #1
  .addVertex(0.0, 1.0, 0.0)      // Vertex #2
  .addIndices(0, 1, 2);          // Lastly, add a triangle.
let mesh = builder.build();
The following code creates a mesh that has three lines. The first is red, the second green, and the third blue.
let builder = new PosColMeshBuilder(this.gl);
builder.setPrimitiveType(this.gl.LINES);
// First line.
builder
  .setColor(1.0, 0.0, 0.0, 1.0)  // Make the current color red.
  .addVertex(-1.0, -1.0, 0.0)    // Vertex #0
  .addVertex(-1.0, 1.0, 0.0)     // Vertex #1
  .addIndices(0, 1);             // Make a line using the last two vertices.
// Second line.
builder
  .setColor(0.0, 1.0, 0.0, 1.0)  // Make the current color green.
  .addVertex(0.0, -1.0, 0.0)    // Vertex #2
  .addVertex(0.0, 1.0, 0.0)     // Vertex #3
  .addIndices(2, 3);             // Make a line using the last two vertices.
// Third line.
builder
  .setColor(0.0, 0.0, 1.0, 1.0)  // Make the current color green.
  .addVertex(1.0, -1.0, 0.0)    // Vertex #4
  .addVertex(1.0, 1.0, 0.0)     // Vertex #5
  .addIndices(4, 5);             // Make a line using the last two vertices.
let mesh = builder.build();
14.2.4 Implementation of PosColMeshBuilder
Let us now look at the code that makes the above usage possible. The source of the PosCollMeshBuilder class is available in the pos-col-mesh.js file in the chapter-14/program-2/src directory of the book's code repository, just below the PosColMesh class. We shall start with the constructor.
export class PosColMeshBuilder {
  constructor(gl) {
    this.gl = gl;
    this.positionData = [];
    this.colorData = [];
    this.indexData = [];
    this.color = [1.0, 1.0, 1.0, 1.0];
    this.primitiveType = gl.TRIANGLES;
  }

  :
  :
  :
}
The constructor simply creates some arrays to hold the data. We can see that it sets the default value of primitiveType to gl.TRIANGLES and make the "current" color white. The data stored in the fields are used to build a PosColMesh in the build method.
build() {
  return new PosColMesh(
    this.gl,
    this.positionData,
    this.colorData,
    this.indexData,
    this.primitiveType);
}
The other five methods simply modify the fields appropropriately and return this to allow method chaining.
setPrimitiveType(primitiveType) {
  if (primitiveType != this.gl.POINTS
      && primitiveType != this.gl.LINES
      && primitiveType != this.gl.TRIANGLES) {
    throw Error(`Primitive type ${primitiveType} is not supported.`);
  }
  this.primitiveType = primitiveType;
  return this;
}

setColor(r, g, b, a) {
  this.color = [r, g, b, a];
  return this;
}

addVertex(x, y, z) {
  this.positionData.push(x);
  this.positionData.push(y);
  this.positionData.push(z);
  this.colorData.push(...this.color);
  return this;
}

addIndex(index) {
  this.indexData.push(index);
  return this;
}

addIndices(...indices) {
  this.indexData.push(...indices);
  return this;
}
14.2.5 Building and Rendering Multiple Meshes
The reader might have felt disappointed that we have been introducing much new machinery into the code base just only to render the same mesh in Program 1 in a different way in Program 2. The author would like to ensure that this is not the case. As said earlier, the main benefit of the new mesh abstraction is that all details of the mesh is bundled together, and we can now treat a mesh as a unit. This is demonstarted in Program 3 where the user can choose one out ten of prepared meshes to display.
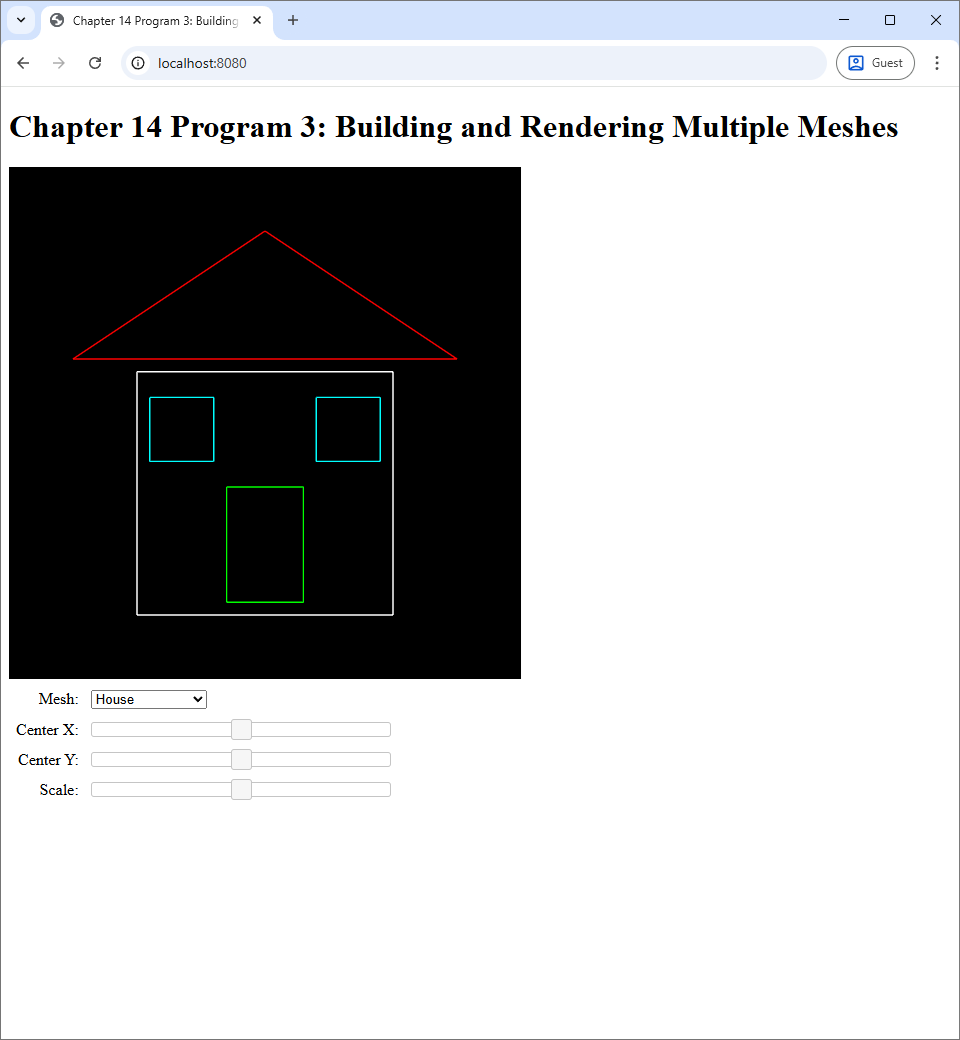 |
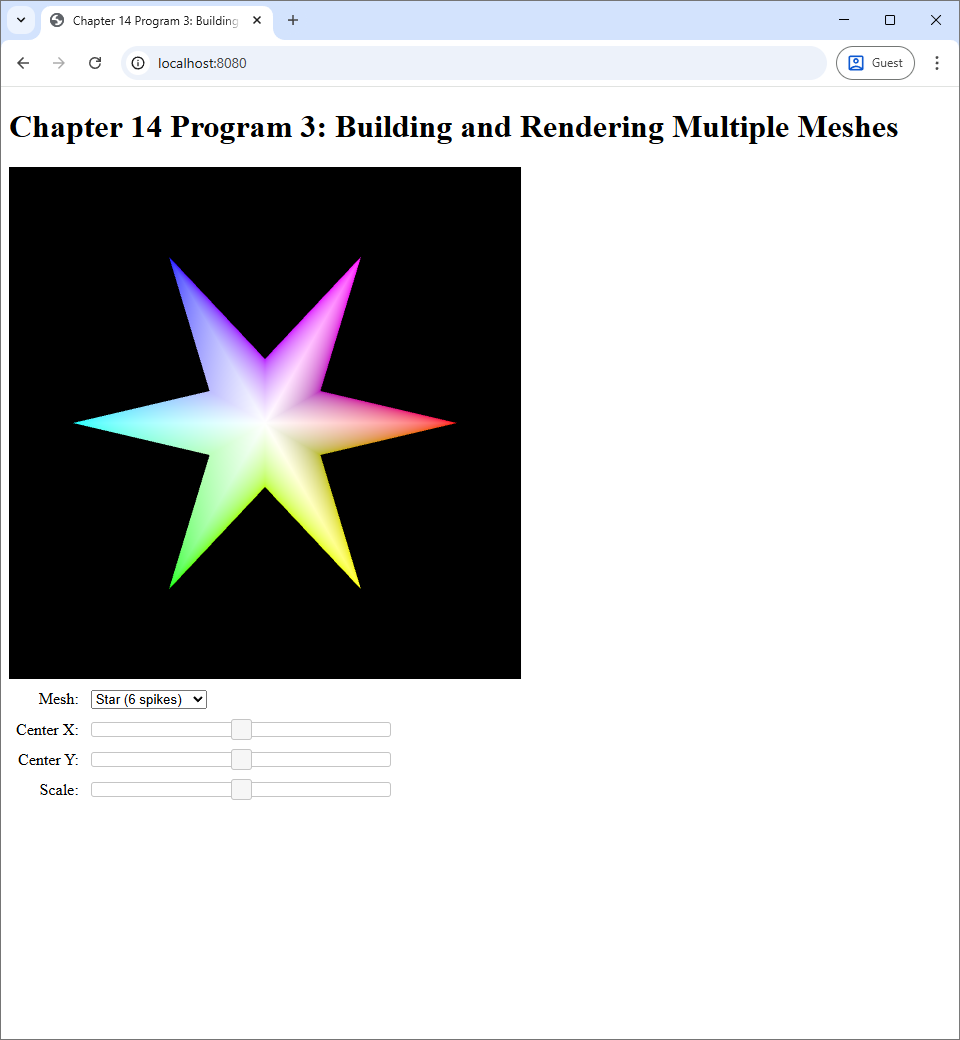 |
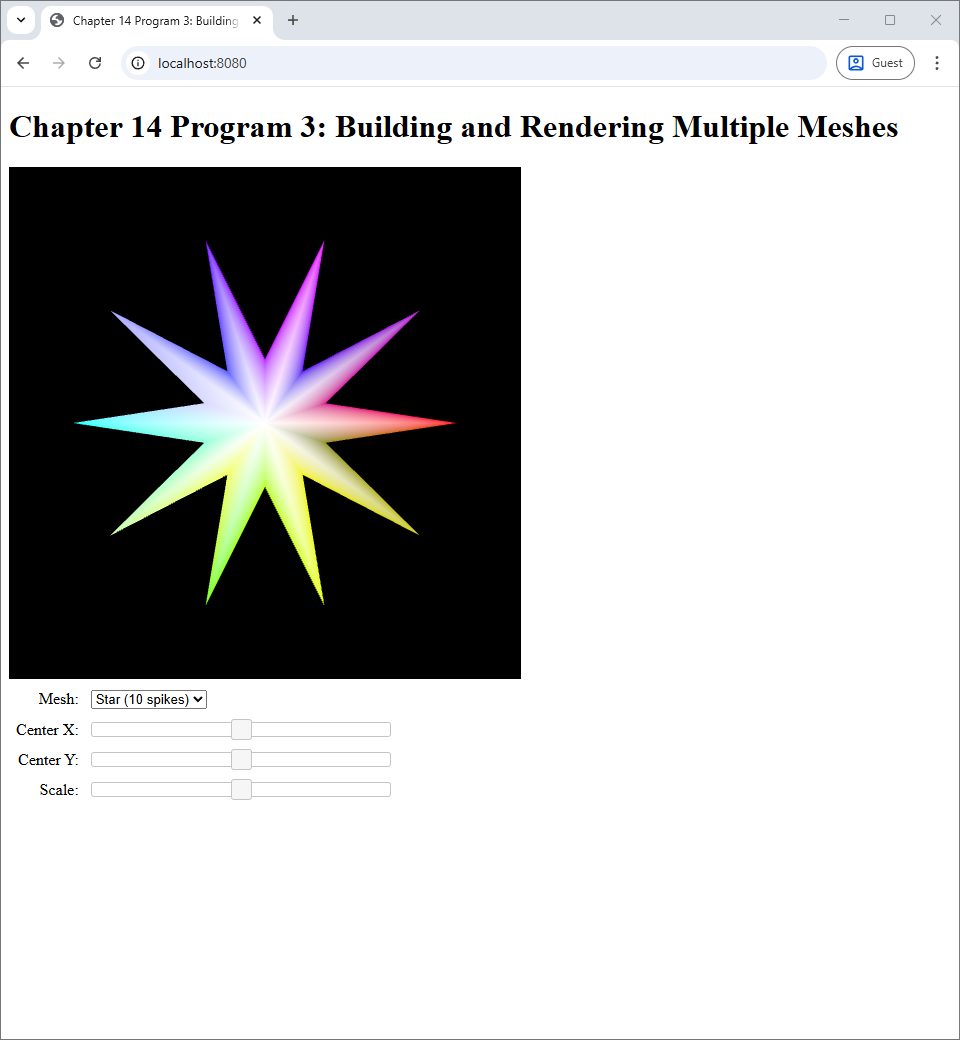 |
How the program works is quite simple. We write methods to create meshes using PosColMeshBuilder. (Details are omitted for brevity.)
createHouseMesh() {
    let meshBuilder = new PosColMeshBuilder(this.gl);

    :
    :
    :

    return meshBuilder.build();
}

createStarMesh(numSpikes) {
    let meshBuilder = new PosColMeshBuilder(this.gl);

    :
    :
    :

    return meshBuilder.build();
}
Then, in the createMeshes method, which is called when the application starts running, we use the above methods to populate an array of meshes.
createMeshes() {
    this.meshes = [this.createHouseMesh()];
    for (let numSpikes=3;numSpikes<=12;numSpikes++) {
        this.meshes.push(this.createStarMesh(numSpikes));
    }
}
When we render the scene in the updateWebGL method, we pick the mesh from the array and just call draw on it.
// Get the mesh ID.
let meshId = parseInt($("#meshId").val());

this.program.use(() => {
    self.program.uniform("center")?.set3Float(centerX, centerY, 0.0);
    self.program.uniform("scale")?.set1Float(scale);
    self.meshes[meshId].draw(self.program);
});
14.3 Summary
- In this chapter, we introduce two abstractions to help tame the complexity of WebGL programming: the
GlProgramand thePosColMeshclasses. - The
GlProgramclass encapsulates a GLSL program.- It main features are the
attributeanduniformmethods, which can be used to conveninently access vertex attributes and uniforms by names. - Through the use of optional chaining, we can write code to set up vertex attributes and uniforms without having to check whether they exist in the program. This simplify GLSL program development and debugging.
- It main features are the
- The
PosColMeshclass encapsulates a colored mesh.- It contains all the buffers related to a mesh inside, allowing us to treat the mesh as a unit instead of as a collection of separate buffers.
- Its
drawmethod configures the WebGL program's vertex attributes, sets up the index buffer, and performs rendering in one step. This significantly shortens the code needs to draw a mesh. - The class also comes with a builder class
PosColMeshBuilder, that makes creating mesh more intuitive.